Showing posts with label 3 d Projects. Show all posts

Friday, December 5, 2014

Would you like to build a Snowman?


Isn't he just the cutest little thing.  And easy too.  Put these snowmen to work as cute package toppers or place card holders for table settings. Or gather together your kids or grandkids together for a fun little party making snowmen families to decorate your home.

Create the hat using a 2-1/4" circle, a 1-1/2" circle, and 1-1/2" x 5" strip of cardstock or Designer Series Paper. Make the snowman’s body using 2-3/4", 2-1/4", and 1-7/8" circles (or whatever size you wish)! Use the Owl Punch for eyes and the Bird Punch to make the nose and mouth. Easy!


 If there is anything I can do for you
Supply list:
 
EarlyEspresso Cardstock (item # 119686)
KraftCardstock (item # 133674)
PumpkinPie Cardstock (item # 105117)
WhisperWhite Cardstock (item # 100730)
NordicNoel Designer Series Paper (item # 135822)
GoldFoil Sheets (item # 132622)
RedGlimmer Paper (item # 121790)
RealRed 3/8" Satin Woven Ribbon (item # 135840)
FrostedSequins (item # 135835)
BirdPunch (item # 117191)
OwlPunch (item # 118074)
Circles Collection Framelits Dies (item # 130911)
WonderfulWreath Framelits Dies (item # 135851


http://www.stampinup.com/ECWeb/ItemList.aspx?categoryid=493


 Click here to see All the Year-End Closeouts.
Remember, these items are while supplies last.
To shop click here.


Please do not hesitate to ask.  Just go to the Contact button on
my Stampin' Up Website and leave me a message.  I will get back
to you as quickly as I can.  
I hope you have a Wonderful Weekend!!!
Cheryl
 

Friday, November 21, 2014

Christmas Angel with instructions


Here's something I always think about during Christmas.  I love to watch the Halmark Christmas Movies on TV and there seems to be an Angel in most of them.  So today is a gloomy day and I had a friend ask me to make an Angel so here it is.  Especially for my friend Sandra & Marriane.
Below are the instructions for making this little Angel.


Cardstock
Whisper White   #100730  pg 183 AC*
Very Vanilla  #101650  pg 183 AC*
So Saffron  #105118  pg 181 AC*
Dazzling Diamonds Glimmer paper  #135315  pg 193  AC*
Champagne Glimmer paper  #127885 pg 193 AC*

Punches
1--  1 3/4 Scallop Circle  #119854  pg 220  AC*      body  Whisper White -score on both sides by counting from the middle 4 scallops-fold and cut off top-to fold down evenly
2--  1" Circle  #119868  pg 221 AC*                         head  Very Vanilla
1--  3/4" Circle  #119873  pg 221 AC*           halo  Glimmer paper   punch 1/2" first then 3/4 around it
1--  1/2" Circle  #119869  pg 221 AC*                       halo
2--  Scallop Oval  #119856   pg 221 AC*                   wings  WW c/s cut on a diagonal to form wing
2--  Cupcake punch  #121807  pg 223 AC*                hair   So Safron  use the frosting part for hair.

Other items I used:

 hot glue gun
Multipurpose Liquid Glue pg 204 AC*
Dazzling Details pg 213 AC*
Stampin' Up Trimmer pg 216 AC*
embossing folder -your choice  pg 226 & 227 AC or Holiday catalog has some also

For Face
pink Pirouette #126956 pg 181 for cheeks-  I use a q-tip
Real Red marker  #100052 pg 180  for mouth
Basic black marker #100082 pg 183  for eyes
Uni-ball Signo Gel Pen #105021 pg 211 AC  for eyes

I put mine on a mini Milky Way and added a string to hang on the tree.
Hope you enjoy making these cute little Angels.
And
I hope you have a GREAT Weekend!


*AC- annual Catalog

Tuesday, November 5, 2013

My Wedding Pop n Cut card

Here is my Dress Up Pop n Cut card I made for an upcoming wedding this weekend.  The wedding colors are plum, tan and white.  I love the way it turned out.  I hope they enjoy it!  I will post instructions if anyone is interest.  Just send me a comment at the bottom and I will post them.

Thanks for looking.  I hope you enjoy the rest of your day.
Cheryl

Tuesday, May 14, 2013

Here comes the Bride Pop "N Cut Card


 June is right around the corner and you know what that means.....Weddings.  So I have gotten started making wedding cards for the weddings we will be going to this year.  This is for the first one.
Here's what I used:
Pop n Cut card base  #130099  $39.95
Dress form Pop n Cut's  #130100 $21.95
Dress up Framelits  #130101  $24.95
Delicate Designs Embossing folder  #127023  $8.95
Fancy Fan E/F  #127751  $7.95
Word Window punch  #119857  $15.95
Decorative Label punch  #120907  $16.95
Itty Bitty Shapes punch pack  #118309  $16.95
Owl Builder punch  #118074  $16/95
Ex Lg Oval punch  #119859  $16.95
1 1/4" Circle punch  #119861  $15.95
Blossom punch  #125603  $16.95
Labels Collection Framelits  #125598  $26.95
white tule
                    pearls  #119247
                     Dazzling Details  #124117  $2.50

Basic Black c/s  #121045
Pear Pizzaz c/s   #131201
Whisper white c/s  #100730
Daffodil delight c/s  #119683

I used the digital studio to make my sayings.

Hope you enjoy my card.

Blessings,
Cheryl

Thursday, May 9, 2013

Southern Bell Punch Art

Isn't this just the cutest thing.   I LOVE PUNCH ART.   My friend Olivia made a beautiful punch art doll a week ago at our demo get together but I didn't get to go because I was sick.  She showed it to me Tuesday at our downline meeting when I made the Camera Punch art card. She told me how to make it  and then came home and made my own.  I don't know if she had made it into a card, but that's what I did.  .  If you would like to check out Olivia's blog-click here

  It is so easy to change the looks of things. This is a 5 x7 card.   I changed my card up - by adding some pearls, flowers,  some accent colors to the skirt and dimensionals to the dress.  Here is my dress card.


PaperWisteria Wonder  -new 2013-15 in color
Regal Rose c/s - being d/c'd
Whisper White c/s  #100730
Daffodil Delight  #119683


Blossom Punch  #125603  $16.95 -  Dress  cut 4
Ex Lg Oval  #119856  $16.95  Waist & Hat cut 1 for hat
Scallop Oval Punch  #119856  $16.95  Hat  cut 1
1 3/8' Circle Punch  #119860  $15.95 Hat
Itty Bitty Shapes Punch Pack  #118309  $16.95  flowers
Full Heart Punch #119883  $16.95  arms  & ribbon cut 2 bottoms (V part- do a double cut) for arms and cut a straight cut to make the elbow  Use the round part of the heart to make the ribbon of the hat (by doing another double cut)
Fancy Fan Folder  #127751  $7.95
5/8" Flower Trim  #126869  $6.95  Spring Catalog pg 5 (only available til May 31.2013) I used 4 but I did cut them down to make them smaller
Pearl Basic Jewels  #119247  $4.95 
Dazzling Details  #124117  $2.50

There you go I hope you try this.  You could use this for so many things-wedding, girls birthday, hello.  Dress her up or down to use for what ever occasion you need.  Let me know what you think.  Thanks for looking.
Blessings,
Cheryl

Wednesday, May 8, 2013

Happy 4th of July

This weekend I was trying to get ready for our down line meeting I started experimenting with my Pop n Cuts.  After looking at many on line for samples I came up with this one.  I hope you like it. 


The fireworks are just hand cut and wrapped with baker's twine.
The stars are a retired die cut.  (sorry)
The hat is made with the curly punch and word windows punh and then I cut our 1/2 of a small oval and made the blue trim. 
The saying is made with My digital studio.


I cut out a few different colors of background papers with the new die.  Made a flag.  Digital Studio for my saying and somewhere online a found this adorable suit.  Well actually I found 3 suits so I combined a little of each one.  I am in the process of making mine and then I will share it with you.  Hope you like it. 

Thursday, May 2, 2013

Bloomin' Bouquet (Available only while supplies last)

Have you ever been waiting for something and it seemed liked it would never get here.  Well,  that's how it's been for me with this new "Bloomin' Bouquet" set that came out on Monday.   You could order it at 3:00pm (MT) -2:00 here.  And I was all ready to order it and I did.  It seems like I've been waiting forever but you know I haven't.  (only 3 days-almost)  But I got it this morning and I have already made one of the sets I got.  They are adorable and will be perfect for Teacher Appreciation next week.  The set comes with flowers enough to make 13,  the centers (buttons)  the wire and the backing.  All you need is a glue gun.  Now you know me.....I did change mine up a little.  I changed the centers of the flowers ( on some of them) cut some of my flowers to change the petals,  inked them,  added leaves to the stems, and Glitter.  I LOVE GLITTER!   To finish them off I tied them each with ribbon and added the saying with a glue dot and there you have it.  I made 4.  2 sets of 4 flowers. 2 with 3 and 1 with 2.  You can change them up any way you would like and in any quanity you want to give.  I bought 2 sets - perfect for Ali to give her special teachers at school.  Hope you like them.  Let me know what you think.  Have a great night!

Bloomin' Bouquet  #134542  $12.95 ( Available only while supplies last)
(everything you need to make and finish all 13 flowers except 
for a glue gun) 
Didn't they turn out beautiful?

Wednesday, March 20, 2013

It's Officially Spring

Can you believe it's the first day of Spring.  I hope you are having beautiful weather to start this season off.  Here it's been POURING all morning but the afternoon is still to come and I am hoping for sunny skies.  So to keep busy I made a bunny candy house.  I put a little jumping bunny and some candy in it.
I made it with the tags dies pg 193 in the big Idea/Catalog book.  # 115954  $21.95
I use this alot to make bookmarks, and little candy boxes.  I usually have been using the small tag so this morning I decided to use the larger tag.  The box measures 4 3/4 x 4 3/4.  Scored at 2"  on all sides.  The 2 sides across from each other I cut on both of the sides next to the middle.  (You should only have 4 cuts total-2 on each side)  I then fold the ends to the inside and glue them together.  I cut 2 large tags and glued them to both sides of the box.  I cut a piece of DSP(sorry this one is retired but this was the first one I made and sometimes I have to do a little adjusting-not this time)  Cut my DSP at 2" x 8 1/2" and taped it to the side of the box.  Keeping it right at the same height as the sides.  Then I used the New  5/8" Flower Trim pg 5  New Spring Catalog  #126869  $6.95  -you get 2 yards .  I use it alot because I think this is one of my favorite things in this catalog along with the Delicate Details Lace Tape pg 3 New Spring Catalog,  #130966 for  $9.95.  You get 2 rolls and you can use them over and over again if you use you dauber to ink it on your paper and then remove it.  It turns out very pretty and if you use Versa Mark you can even emboss it and it is beautiful.  Anyways,  let me get back to my instructions.....I used some Very Vanilla ribbon to tie through the holes that are already cut from the tag die and tied a knot.  Then made a small Very Vanilla bow and using a glue dot I attached it on the other side.  I then decorated the top with some extra paper, added a sentiment from the -A Little Bit of Spring Stamp set- pg 22 New catalog  #126009 (w) $31.95 or #126011 (c) $23.95.   Made a little flower using the 1" scallop punch and the new 7/8" scalloped punch. This was pretty easy.  And really cute.  I always make things to give to our neighborhood kids and this is going to be one of them.  I think they'll really like it.  Let me know if you do.
If you need any help please do not hesitate to call me.  Thanks for looking.  And Happy Spring!

Monday, March 18, 2013

NEW Basket Class

Basket class MAR 28  10:00 AM - 12:00 PM (Pacific)
2 Classes------ 10:00-12:00pm and 6:00-8:00pm
This will be a  FUN class!   We will be making a  basket and you will go home with supplies to make 2 more.   Making your own baskets are not as hard as they look.  Once we make one-you will be able to make all sizes.  We will be making the basket, a card, and a Easter Chick Candy holder.
 Date;  Thursday  April 28th    I will be having 2 classes that day.
Time: 10:00-12:00      6pm-8pm
Cost:  $20.00
Bring adhesive and scissors. 
Limit of 4 people per class
RSVP is needed by Friday, March 22, 2013 12:00pm
253-987-7147
You will receive a kit.  We will use it to make 1 basket and the rest you can take home to make more or something else you would like to make.
Kit contents:
3-pieces of  Tea for Two DSP.   (new in the Spring Catalog)  pg 3
3- 1 1/2" pieces of cardstock - Calypso Coral, Island Indigo, Pretty in Pink (one of each)
2-4 1/4" x 11" cardstock for decorating  (I will have these cut and you can pick which ones you want)
1-4 1/4"x 5 1/2" cardstock (lucky Limeade) for decorating
14- 5/8" Flower trim  (New Spring Catalog)
1- 6" Delicate Details Lace Tape  (reuseable) ( New Spring Catalog)
18-Rhinestones
Pictures on my Stampin' Up Website

http://something4everyone.stampinup.net
RSVP by Friday March 22nd.  
I need to place my supply order for the class.

  These are the other 2 projects we will do at the Basket Class.


 I will show you how to make a basket and you will be able to make  different sizes by adjusting the paper size.  Baskets for any season. 


Friday, March 15, 2013

One of my school projects...St Patrick's Day


This was one of the school projects I did this week at Ali's school CCHS.  (Cascade Christian High School)  The kids are all in 9th & 10th grade- both boys and girls.  The Applied Arts teacher-Mrs. Cole- has been asking me each semester to come and teach the kids how to make cards.  We make 3 cards and 1 fun project for them. (Even Mrs. Cole get's to make them). One of the 3 cards they make, they give back to the teacher (card of their choice) and they take them to a convalescent home and give to the elderly.  How exciting for them to receive a card and how nice it is for the students to be able say they made it.  Each kid writes their name on the back of the card so whoever receives it can see who made their card.  The other 2 cards are for them to use.  I make 3 cards samples- 1 easy, 1 medium & 1 harder.  The kids do all the work on the card.  I just make the sample and cut the paper for them.  I bring the Big Shot, embossing folders, framelits, stamps, ink, punches-everything they will need to complete the card.  I go over how to use the Big Shot, framelits, embossing folders  and everything they will need to complete the card and they do the rest.  The Big Shot is always the hit of the class.  When they see what it can do they just love it!

The 3rd card will start the day off on Monday.  And, I will tell you the ones they have done have all turned out beautiful!  Some make them exactly how I made the sample and others make it their way.  I think they have all turned out beautiful.  Yesterday, we started the class off  by making the Shamrock  so they could take it home with them for St. Patrick's day. They all enjoyed making these and I love watching them make them.  Cards and crafts are alot of fun to make.  Sometimes they just look harder than they really are.
I will post the other projects next week after they have finished.  I want them to be surprised.   I hope you have a Blessed St. Patrick's day weekend!


Tuesday, March 12, 2013

Cascading Card

 A few weeks ago  when my daughter was sick I was sitting in the Dr office, reading one of  his magazines and  I came across an articale with a picture of a card someone had made. I loved it but No directions of course but I was thinking I might be able to make it.   So I took a picture of it,  went  home, and forgot all about. it til I found the picture last night at dinner.  So I decided to try and duplicate it. It took me a while and  I'm not so sure I made it the same as the person in the magazine did but I really do like it how it turned out.  So the name I gave it is the Cascading card.  It does fit in an envelope--yep I tried.  I am going to make another one and then I will be having a class on it.
I used the Secret Garden bundle for the flowers and Birthday Bash stamp set.  Kinda cool hun?  And folds down really nicely.  Let me know what you think.

Sunday, March 3, 2013

How to make a Daffodil

I was walking the Puppies the other day and saw that the Daffodils are peeking there heads out of the ground.  Maybe Spring is around the corner.  So I came home and decided to try and make a Daffodil.  I was thinking it would be hard but really not so hard at all.  So here how I did it.
 Down below is a pic of the things I used.  The Green stem base I actually did in yellow...Same as the flower color.  I showed it in green so you could see it good.  The leaves I cut by hand.  Daffodil leaves are long and pointed so I used Gumball Green and attached them to the stem.  I also added another flower that I added after I put on the leave.  I just nestled it in between the the stem and leaf.

Daffodil Delight c/s  #119683  $6.95
Gumball Green c/s  #126840  $6.95
cut 5 of the lg petals using the Blossom Petals Builder punch  #121808  $16.95  (these are the  flower petals)
cut 1 using the  1-3/4" Scallop Circle punch  #119854  $16.95 (this is the center piece)
cut 4 using the Itty Bitty Shapes Punch Pack  #118309  $16.95
(these are inside the the center of the flower)
1-gumball green piece of 1/2" x 6"

                                                    
cut 1  3/4" Daffodil delight  circle punch
1- orange brad
2-  1/2" circles
Bone folder
sm wooden Dowel
Glue gun
Silicone mat

Directions:
Petals
Using your bone folder curl up the edges of the petals til you get the desired shape you want.  Lay out all the petals on a your silicone mat and space them out evenly.  I cut off the bottom a little and made them a little shorter.  Then I punched a 1/2 circle off the bottom end so they would not be bulky and it was easier to shape them.  (The center will be covered up).  Glue them into shape and set aside.
Scalloped circle center.
Cut a small hole in the center of the scallop  & count around 8 little scallops.  There are 14 but I used only 8.  Using my scissors I cut to the  point in the center and cut away 5 scallops.  The scallops left I then made folds on each point all the way around.  This is what made it a circle.  I glued the last 2 scallops together - one on top of the other to make the circle. .  (See pic below) 
Flower Center 
Put a brad through the little flower like shapes and through the small 1/2 " circle.  Using your finger fluff up the sides of this little flower shape.  Cut a tiny bit off the 1/2" circle piece now.  Then glue it down into the center piece that you just made.  Then glue this piece to the center of the flower petals that you just made. 
Stem & Flower stem
Using the 1 3/8" DD circle  fold it into a cone shape and glue.  Leaving one end bigger than the other.  The larger end use you scissors to make cuts to help form a circle to adhere to the back of flower.   Using your exact o knife make small straight lines in the middle to fit around the stem and glue into place.  (just keep sliding it up on the small end til you get the right size to hide the rough edges).  Glue into place.  
The Stem I wrap the 1/2" x 6" piece of Gumball green around a wooden dowel (but use anything small and round like a pencil) just til you get the roundness you desire.  The end has to be small enough to fit into the yellow part of the flower.  When you get it glue it inside and slide the stem in.  
Leaves
Leaves on Daffodils are long and thin.  I just cut 3 long pointed leave out by hand and glued them so the leaves would be close to the bottom of the flower.  I then added one more flower but cutting the stem at a V and gluing it in place behind a leaf.  Add more leaves if you wish. 

If you want a longer stem then add more inches to the 1/2" piece of paper. 
You can make your petals shorter if you want or cut them in on the sides to make another shape.  I have done this also.  Once you have made one it will be easy for you to  change it around.

Hope you enjoyed this tutorial.
Thanks for looking.

Blessings,
Cheryl

Need a catalog, demonstrator I would love to help you.  
www.something4everyone.stampinup.net

Saturday, March 2, 2013

How I make Roses


I have had alot of questions on how I make my roses.  So, I decided to explain how I make them.  Depending on how large you want them is how many petals you punch.  My rose is about the same size as a real rose.  But the smaller ones are just as pretty.  Use whatever color paper you want and you do want to ink the edges of each petal so pick a color that makes each petal stand out.  After your all done you can glitter it all up if you want.

This is what I used to make this rose.

Very Vanilla c/s  #101650
Petals are made from my Ornament punch  #116847  $16.95
Rose Red ink  #126954
Lucky Limeade c/s   #122926

Blossom Petals Builder punch  #121808  $16.95
1 3/8" Circle punch  #119860  $15.95
1/2" Circle punch  #119869  $5.95
dauber
pencil
bone folder
crimper
glue gun


Flower instructions
I punched 27 ornaments and used the Rose Red ink around the edges of each one.  The pointed side is the top side of the rose.  The other end you want to use to adhere it to the circle punch.
1- Very Vanilla  1 3/8" circle punch.  This is what you adhere each ornament punch to to make your rose. 
  Cut one piece of Very Vanilla c/s- 1 3/8" x 1 3/4".  On a diagonal cut down about a 1/2 " and use the dauber again on this area.   The use the dauber on one end and down on both sides.  This is the center of the flower.  Using your bone folder  break down the paper on both sides.  The use the pencil to wrap it up into a tight circle for the center of the flower.  Make it as tight as  you can get it so when you let it loose it looks like a flower center.  If it needs to be tighter do it again and when it looks right use you glue gun on the side to make it stay that way. On the bottom use you scissors to cut small cuts about 1/4" up and bend them upward.  Set aside.

Stem, & Back of flower
Cut 2 Lucky Limeade 1 3/8" circles. First use your bone folder to break down the fibers of your paper then on a diagonal round fold, fold the circle in half(round)  with one end small and the other end bigger.  (see pic)  Cut ends on larger end about 1/4" up.  Using your 1/2" circle punch-punch a circle in the center of the other Lucky Limeade 1 3/8" circle. (see pic)  Set aside.
The longer piece of lucky limeade measures 1/2" x 5 1/2".  This is your stem.  Wrap you paper around the pencil to make it easier to role into the stem.  This piece must be small enough to fit into the small end of the round lucky limeade piece you just made.  Use your glue gun to adhere them together.

Leaves
Using your Blossom Petals Builder punch cut 3 (or however many leave you want) of the long petals.  Fold each one in 1/2.  The using the crimper-face the open side to the left and run it through on a slight angle.  This will make it look like the vanes in a leaf.  Open it up and using your finger just bend it down slightly to make it look pretty.  Set aside.

Now lets put it all together.

Start by using your glue gun to put the center (the end with the little slits) onto the round piece of Very vanilla c/s. (I put my off center just a little so it didn't look too straight).  Then start adding your petals with the pointed side upward.  You want to make each row not directly behind the one in front of it.  Keep going it you get the right size you want for your flower.  I thing I used about 27.  When you get to the edges keep pulling them down a little to cover the bottom and the last layer you want to put the little lip on the outside of the round Very Vanilla c/s.
After the last petal glue your small circle round stem to the back of the Very Vanilla c/s close to the center.  Then glue the Lucky Limeade circle with the smal circle cut out  on to cover the V Vanilla circle.  Glue the long narrow L Limeade piece into the center of the stem.  Add the leaves and you have a beautiful rose.

Adjust the lenght of you stem by adding more inches.

Hope you enjoyed this.  Let me know if you have any questions.

Blessings
Cheryl

Monday, August 13, 2012

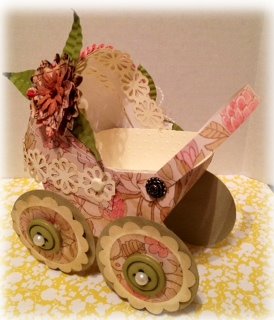
                                          Baby Stroller


Well today I was going to make swaps for regional's but somehow I got off on trying to make a baby stroller.  Maybe I'll do swaps tomorrow.  
This took me all day.....off and on....but I just finished it and I think it looks good.  I used so many things on this and I made so many things to embellish it I would not know where to start.  But tomorrow is another day and I will try to put the directions down on paper and post them.  Hope you like it. Let me know what you think.