Tuesday, February 28, 2017

Moon Baby instructions

Here are the instructions for the Moon Baby cards I posted yesterday.  
 Pink Piroquette c/s  #111351
Momento ink  Black  #132708 pg 180 AC
Melon Mambo Stampin' Write Marker pg 171 AC
Pink Piroquette Stampin' Write Marker pg 171 AC
Stickles  Star dust

 Soft Sky c/s  #131203 pg 171 AC
Whisper White c/s pg 170 AC
Soft Sky Write Marker pg 171 AC
Daffodil Delight Write Marker pg 171 AC
Memonto ink   Black  #132708 pg 180 AC
Stickles

Daffodil Delight c/s pg 171 AC
Whisper White c/s pg 170 AC
Pink Piroquette ink & marker pg 171 AC
Sky Blue ink & marker pg 171 AC
Daffodil Delight ink & maker pg 171 AC
Momento ink pad  Black  #132708 pg 180 AC
Stickles
 

With each card I stamped the babys outfit with Black Memento ink on the color paper of the card you are making. I cut around the outfit and glued it to the paper.  The I did the same for the umbrella- cut it out and popped it up with a dimensional.  Colored the babys hair the color of choice and then the baby toys.  The Hello Baby is popped up with a dimensional also.  
Whisper White c/s  5 1/2 x 8 1/2  scored at 4 1/4
Colored cs 4 x 5 1/4
Whisper White 3 3/4 x 4
Using the Star stamp in the stamp set I randomly stamped the stars all over the paper.  Using the markers I filled them in the color of the card and then went back and added some stickles for the glitter.
Tomorrow I will make some more cards using this set.
Check back and see what I come up with.  Enjoy you day!!!
 

Monday, February 27, 2017

Moon Baby

So Excited when my Stampin' UP order comes.  One of my  newest stamp sets is "Moon Baby".  Baby Cards are so fun, cute, and exciting all at the same time.  So not know in which card I will need-I made
 all 3.  These were Easy to make and I have shown what  I used to make each card.  Most everything I already had so other than the cute stamp set I didn't have to get anything else.  

Tomorrow I will be making some more using this stamp set.  
Check back tomorrow for the instructions for these cards.

Sunday, February 26, 2017

Newest Embossing Inked cards


10 cards in 35 minutes.....I love it!  And I LOVE all my embossing folders....both Old, New, Stampin' UP, and lots of others I have accumulated over the years.  I love these rainy days when I just go in and craft.  With no idea of what I am going to make.  I will post the other 5 tomorrow.  
Any questions just let me know.
Have a good Sunday!!!

Sunday, February 19, 2017

Cute, Fast & Easy 
Love these kind of cards. 
Old Olive, Melon Mambo, Daffodill Delight, Chocolate Chip ink/paper, Wisteria Wonder are the inks
I used to make this card.  
Whisper White c/s  5 1/2 x 8 1/2 scored at 4 1/4
Chocolate Chip c/s 5 1/4 x 4
Whisper White c/s  5 x 3 3/4 (this is the paper I emboss on and ink on)  
Lg Oval punch and then I hand cut around the birthday greeting on Choc chip paper-then I used my glimmer pen to make it shiny.  
I colored all the flowers with alcohol markers and I then used my glimmer pen to make the shine.
I love the colors on this card and I love the way it turned out. 

Friday, February 17, 2017

You know how I LOVE embossing folders....well I found some new ones and I bought them.  Here is
what I did with the newest ones in my collection.  
It seems like the most cards I make are Thank you and Birthdays.  Card making is fun and so relaxing to me. During the different holiday I make lots of different cards and then I like to send them out to my friends/customers.  Did you receive on for Valentines Day?  If you like my posts I will send you one. 
This is another one of the the cards I made using 3 different embossing folders.  I used 3 different inks and then I colored in the flowers with my alcohol  makers.  And it doesn't show up very well in the photo I used rhinestomes to accent some of the flowers and I used my alcohol glitter pens to make the flowers shine.
Hope you like it.  Fast and Easy.  I Love this kinds of cards.  Do you?

Monday, February 13, 2017

I can't believe Valentines Day is almost here....

So  I just had to make this SAB set "Hey Chick" stamp set into a Valentine card.  
I stamped the chicken with Momento ink and reversed stamped it.  
Using the NEW Colored pencils I colored the chickens. 
The background I used the drag technique. 
Hey Chick stamp SAB set #143328 pg 17  Free with a $50 purchase
Envelope punch board pg 184 AC  #133774 $20.00
Momento Ink pg 180 AC #132708 $6.00
Watercolor Pencils pg 24 OC #141709 $16.00
Confettie Hearts Boarder punch pg 187 AC #137415  $22.00
Sweet & Sassy Famelits  pg 193 AC  #141707  $35.00 15 dies
Send with Love stamp set  pg 15 OC #142815  $21.00 (Real Red ink used)
Delicate Details Stamp set pg 9 SAB Free w/$50 purchase
Inks for background- Delightful Dijon 2015-17 IC, Bermuda Bay, & So Saffron
Cardstock colors used- Whisper white, Bermuda Bay, Real Red & So Saffron

I hope you have a GREAT Valentines day and I hope I have helped you to make 
someones day wonderful!!
Cheryl

Sunday, February 12, 2017

Valentine gift card holder

I love giving Valentines.  I LOVE making Valentines....do you?  Here is an easy gift card holder that is fast and easy using your envelope punch board.  

Using the Envelope Punch board make your first score & punch at 2 5/8.  Next score at the first line and go all around the paper.  
Use your bone folder or whatever tool you have to give your score lines a hard press.  
Measure the inside rectangle to make a envelope.  I then used a circle punch to cut out a center.  Tape envelope to the inside and decorate. 
Turn over and decorate the outside and add your gift card.  I used a mini glue dot to close the outside together.  But if you wanted you could tie a ribbon or make a belly band to close.  
This is a fast and easy project and someone will love receiving it.
Happy Valentines Day!

Tuesday, February 7, 2017

Valentine Mini card & Gift card holder

Today I was thinking some Valentines gift card holders would be a fun idea for my daughter.  It seems all the kids these days LOVE Starbucks and since she works there I thought this would be something she would enjoy giving.  So these are what I came up with below. 


 This card is a 6" x 3" card base.  Scored at 3"
The Punch is Sweetheart #133786 $16.00 Pg 187 AC
The Arrow & words are from the "Sealed with Love Bundle" pg 14 in the OC
  #144705  $45.75 or you can buy the "Sealed with Love stamp set #142815 $21.00 pg 15 OC
"Love Notes Framelits Dies" pg 14 OC #142752 $30.00
To buy both you save 10% if you bundle
 Envelope was made using the Envelope Punch Board on page 184 AC  #133774  $20.00
To make this envelope 
Line the edge of your paper to the 2 5/8" mark.  Score and punch.  The next you line up your score line with the notch and score.  Do all 3 sides the same.  Fold on score lines.
 Before I glued the sides I measured a piece of c/s to fit inside the inside of the envelope.  I made it big enough to fit a Starbucks gift card. Some envelopes my daughter put a little Valentine note and some got both a note and a gift card.  BUT EVERYONE is going to enjoy this little Valentine.

Stamped with the "Sealed with Love Stamp set on the back...added a little glue dot to seal and There you have it.  We made 12 of these in about 1hr 15.  Easy and cute. 
Have fun making these cute little Valentines.

Sunday, February 5, 2017

I think the New "Hey Chick" SAB stamp set is fun!


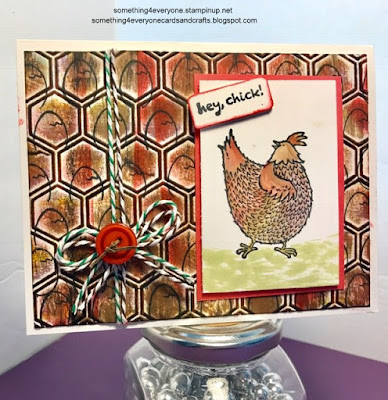
When SAB began I wasn't going to get the "Hey Chick" stamp set.  I just couldn't imagine what I was going to make with it.   Then every time I looked at this set I started looking at it and the little sayings and thought I would get it.  Now....I don't know why I didn't want it.  So many cute cards I have made with this set and here is one of the first ones...with many to follow.  I just love this set and it is actually quit easy to make the cutest things.  Here is one of mine.  I love it inside and out.
 Again I used the technique I shared with you the other day with different inks.  Makes
you embossing folders all look so different.  Love this easy technique.  Try it and leave a comment 
how you liked it. 
Aren't they cute? 

Saturday, February 4, 2017

Dragonfly Stamp set & framelits in the NEW Occasion 2017 catalog

This may be my FAVORITE Stamp set in the New Occasion 2017 catalog.  Although I probably have said this already.  Check the birthday card I made for my girlfriend Connie who just had a birthday.  We are getting together next week and I can't wait to give it to her.
This is another one of the backgrounds that I have been posting about in the last 2 posts.  Isn't it just beautiful...It looks like metal.  I used Gold paper mat.  The background is on Whisper White but you can't even tell.  Using my SU score board I started in the middle of the paper and measured 1" out.  I used Pink Pirouette, Pear Pizzazz, So Saffron, Chocolate Chip & Basic Black (gently)  The Dragonfly is cut out of Gold Glimmer Paper #133719  $5.00  pg 175 AC
Gold Foil Sheets  #132622    $4.00 pg 175 AC
DragonFly Dreams Photopolymer stamps  #142924   $21.00 pg 26 OC
Detailed Dragonfly Thinlits Dies  #142749   $31.00 pg 26 OC
or 
Bundle and save 10% when you buy them together
#144728  $46.75 pg 26 OC
Inks on pgs 169-171 AC
I used Stampin' Dimensionals (#104430  $4.00 pg 182) to pop the Dragonfly up on the card.


Friday, February 3, 2017

Quick & Easy Cards

Here are a few more of the Quick & Easy Cards I posted yesterday.
Love these....
 This one I changed the c/s back to black and put a piece of Whisper White c/s inside to write on.
I cut a slit in the paper and slide in the saying "thank you" and glued it down on the back side.
 Stamped "thank you" and fussy cut it out.  Stamped, colored, & cut out a flower 2x's then using dimensionals I popped it up...added a rhinestone and I Love this card..
 My Favorite!  Love the colors...Great birthday card.
And again...Here is another Valentine Card.  The die is not from SU.  I actually don't remember where I got it but I LOVE it.  The embossing folder is from SU.  Words in the OC catalog 2017

I will post another Birthday card  tomorrow with a GREAT background.  I used the NEW Dragonfly stamp set and framelits in the NEW OC catalog 2017.
 

Thursday, February 2, 2017

New way to make quick and easy cards without buying a thing....

Today I wanted to make some different cards and I wanted to make alot of different ones.  I was watching a lady on You Tube who made these cool backgrounds so I decided to give them a try.  Easy Peezy are the backgrounds.  And then all you have to do is add a couple embellishments and there you have it.  Need a thank you card- make them a thank you....Need a Birthday....make some birthday....whatever you need...you can do that using all your different stamps and ink pads.  
Here we go...

These are a few of the 8 cards I made in 35 minutes.
 Cut 8 pieces of  whisper white c/s cut to 4 x 5 1/4
 Cut 8 whisper white cards 8 1/2 x 5 1/2
score at 4 1/4
embossing folders
ink pads of your choice  (I used 4 colors on each paper) I used my little mini ink pads and even my big Stampin' Up pads..they all worked

To make the cards...
Using your embossing folders emboss each piece of 4 x 5 1/4 cs  (I made mine all different)
I picked out 4 different colors that all went together and starting from the lightest color I pulled the ink
pad top to bottom over the embossed image -making small 1 1/2" lines on the paper all the way across.  (Only pull downwards with the pads)
You can see I tried alot of different colors...even ones I didn't know if they would go together--and they did.
Do this with all 8 pieces of cs.
When your finished you will have beautiful  backgrounds you can embellish however you choose.
Glue or tape the c/s fronts to your cards and you will have many easy cards that look amazing.  
 
Tips
*When pulling the ink pads down your paper you don't have to cover the whole paper with one color ink.  Trust me some pads are juicier than other and you will get alot more ink on the c/s so just keep going. 
*If the pad is really juicy use your heating gun to dry in between each ink color.  This way your colors will show thru and you can get each color you use.
* The embossing folders I used where all different.  When you play with them you will see how different each one looks when you add the ink.  The one that I like the most is one I didn't think I would like at all.

Have fun using this technique....I am still having fun with this.  
I will post more tomorrow.

 SU embossing folder
Balloons SU punch
Words in the OC 2017
 Retired embossing folder
Saying is from the New OC 2017 on pg 14 & 15
retired SU embossing folder
I used rhinestones for embellishments