Sunday, December 10, 2017

Free Shipping Monday December 11 starts at 12:00AM

https://www.stampinup.com/ecweb/default.aspx

FREE SHIPPING

Monday, December 11 receive free shipping on all Stampin’ Up! orders.
One last chance for an exciting offer before the holidays! Free shipping for 24 hours only in my online store.

Free shipping runs from 12:00 AM, December 11 to 11:59 PM (MT).
 
https://www.stampinup.com/ecweb/default.aspx


Monday, November 27, 2017

Stampin' UPs Cyber MONDAY & NEW Etsy Store

Hello Friends,
Today is Cyber Monday for Stampin' UP.  So for Cyber Monday  Stampin' UP is offering FREE Shipping to everyone who places an order today.  Be sure to take advantage of this deal if there are any things you need before the Holiday Catalog is gone.  If I can answer any questions you have Please just give me a call, email or text.  I would be happy to help you anyway I can. Click here to shop.


 Here is the link to my NEW Etsy Store-Luv2beecrafty
Many of you have asked what I've been up to and this is it.  Since leaving WA the thing I really missed was the Craft shows I did.  Especially the Tacoma Holiday show.  I was contacted by some of my Tacoma Dome customers and they told me they really missed my booth & were interested in the buying the items I used to make.  So I have put together an Etsy store-but my Something4everyone name was already used by someone.  So on Etsy I am Luv2beecrafty....which actually fits because that is what I like.  So if your interested be sure to check it out.  If you see something you like PLEASE like my store.  I will continue to put NEW Christmas things on it and then some NEW items during the year.  If you need more than what I have in the store please contact me and I would be happy to make them for you -not thru my Etsy store.

 https://www.etsy.com/shop/luv2beecrafty?ref=shop_name_search_sugg
Happy Monday!
Thanks for Looking 
Cheryl

Sunday, October 1, 2017

Have you HEARD all the Chatter....?

Beginning Today, October 1, 2017- October 31,2017 Stampin' UP is having the buy 3 get one free offer on our DSP.  I LOVE this!!!  This may be my FAVORITE promotion they have.  Below I have posted a picture of the flier.  If I can help you in anyway....please do not hesitate to contact me. 


Friday, September 29, 2017

Treat Purses Tutorial

Hello Everyone!
Here is the tutorial from the Little purses I posted on my FaceBook-Something4everyone page.  If you haven't been to that yet be sure to check it out and like it if you do.  And I want to "Thank You" ahead of time.  Now here goes.  


(The purse I made today I made out of cardstock so it is easier to see the score lines and cuts).
Today we will be making the Top one on the left.  This purse is SUPER Simple to make.  I am making these for Halloween for all my kids & the little kiddos in my neighborhood.  I will post them when I finish.  I haven't filled my yet but you can bet there will be candy in them. 

These are made with 1 piece of 6 x 6" paper.  I used Stampin' UP  DSP.  EXCEPT for the one with the cat.  I wanted to make one not double sided so that one is white on the inside.  And Yes I liked it also.  It has the print around the top and the rest of it is white.  So if you don't have any double sided DSP try it with what you already have.  

So here we go.
 (The purse I made today I made out of cardstock so it is easier to see the score lines and cuts).
Cut you 6 x 6 paper to be 4 1/4" x 6".  Keep the leftover paper-you will use it for the handle and decorating your purse. 


If you like what you see please leave me a comment and if you make some please post them for all to see.  
 I will be posting on both my Facebook Something 4 everyone and here on my blog. 
AND many times they are not the same :)
Have a GREAT day! 

Cheryl


Thursday, September 7, 2017

NEW Merry Cafe Christmas card

 This Merry Cafe Stamp Set in the New Holiday Catalog is one of my FAVORITES.  But this one I did
differently.  I actually stamped the cup on a piece of paper and drew around the stamped cup to enlarge it.  Added a handle and added a piece to make some Hot Chocolate (or coffee).  LOVE how it turned out.  
The background is the NEW Embossing folder in the NEW Holiday Catalog on pg 37.  
What do you think?
Leave a comment if you would like to let me know how you like my card.  
Here is everything I used for this card (except for the adhesive).  Did you see the New Hug in a Mug Stamp set?  Don't you just Love it?
Hope you have a GREAT Weekend!!
Cheryl


Wednesday, August 30, 2017

Painted Harvest stamp set is AWESOME!

I love making things with this NEW Stamp Set.  It is one that gives you the watercolor look when you stamp with it as it is a Two-stamp set & I love these kind.    It doesn't matter what color you use because they all turn out pretty.  On my cards: the large flower I stamped off once and on the 2nd smaller flower I did not stamp off.  (stamping off means to ink up your stamp and stamp it once on a piece of scrap paper just to lighten up the stamping....then when you stamp your next smaller stamp on top you will get the definition  you need to make the beautiful layers show up on you flower)  Just line up the stamps as closely as you can and it will be beautiful. 

Can you see the definition on the flowers...When you begin, stamp on a piece of scrap paper and practice.  To make the different layers on this card....I cut out the flowers (by hand and close to the color of the flowers) and used them by putting some re-positional tape on the back and putting it over the first flower...then stamped the next flower on the white cs and also on the scrap paper and it gives it the dimension of on flower being on top of the other.  I did that 2x's but you do it as many times as you like.  Remember to practice first so you get the hang of it.   I love this technique!  
Here are all the items I used for this card.


 Really an easy card to make.  Just be sure to practice on a piece of scratch paper before going to your card.  It will be alot easier that way.  
I hope you enjoyed this card....If you send me a picture of your card I would love to put it on my blog....be sure to send me you name so I can give you your credit.  

NEW 2017 Holiday Catalog goes live on Friday September 1, 2017


 Yes this Friday, September 1, 2017  Stampin' UPs NEW Holiday Catalog will go live (after 3am MT)  for all to shop.  If you like a catalog and would like me to send one out to you just go to my Stampin' UP website:
www.something4everyone.stampinup.net
Go to Contact me...There you can leave me a message with your name, etc & I will get one in the mail for you.  If Friday comes and you do not have a catalog you will be able to click on the catalog above and it will take you to the catalog for you to view it til you get yours in the mail.  Let me know if I can help you or answer any questions you may have.  
Thanks for looking and I hope you have a Great day!
Cheryl

Tuesday, August 29, 2017

Need a Little Gift?

Need a little gift??? Something you can make to let someone know your thinking of them?? Holidays are coming and we all need little things to give out at Christmas...especially those that don't break the bank and something you can make yourself. 


 Here is that gift and here are the instructions. And it's easy also. Change it up to make it your own or copy mine. FYI:   I made my own DSP using the NEW Painted Harvest stamp set from the NEW Stampin' UP Holiday catalog that is going live on Friday, Sept 1, 2017. 


The colors I chose were:  Melon Manbo, Old Olive & Soft Suede


If you are in need of a catalog just go on my Stampin' UP website and send me your information and I will be happy to send one out for you. Any questions just give me a jingle or send me a note. Have a GREAT Day!
Cheryl
 Any questions let me know


Tuesday, August 15, 2017

NEW Items on the CLEARANCE RACK

New Deals on Clearance Rack
A new season is almost here, and that means it's time for some change. What else does it mean? New Clearance Rack deals! Visit my online store
now and save up to 60% on select products. These deals won't last forever though, so fill up your shopping bag before supplies run out!
https://www.stampinup.com/ECWeb/ItemList.aspx?categoryid=100100
Click here to see the Clearance Rack

Sunday, August 13, 2017

Carol of Christmas

 Here is the instructions of how I made this card using the bundle above.  
The Peace is a retire Framelite from the Holiday catalog last year.

Saturday, August 12, 2017

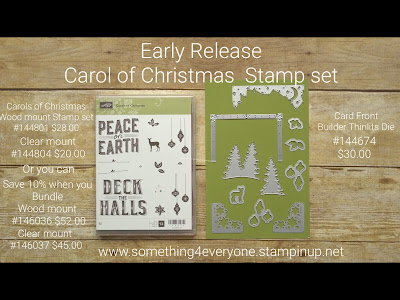
Early Release on the Carol of Christmas Stamp set

The Early release for this stamp set is happening.  The stamp set can be purchased alone or you can bundle and save 10% on the bundle.  This is a great set to use and make all different cards by stamping or just stamping.  I will be posting more cards with this set.  Or jump on over to my FB-Something4everyone to see more.


Friday, August 11, 2017

Sorry I've been away...

You know how summer comes and we all take off and go on vacation.  Well I have been on 3 since I last posted here on my blog.  For those of you that have seen I have been posting on my - Something4everyone- FB blog.  I have found it is easier to post while I was away.  So lets talk Christmas...I LOVE Christmas and as many of you know me from the Tacoma Holiday Show...you know that.  Stampin' UP has there NEW Holiday Catalog coming out begining Sept 1, 2017.  And we demonstrators are lucky to gotten to do our PRE Order from the new catalog.  Let me tell you a little something.....YOU ARE GOING TO LOVE IT!  I do.  So I am going to continue to post on my FB Something4everyone page and I am going to try to continue to post here also.  If you don't see me....check out my FB.  
I LOVE THIS NEW stamp set.
Check it out below..
Hope you like it.  I LOVE IT and its a fun set to you.  
Enjoy
Cheryl

Wednesday, July 5, 2017

Your going to love this one....

What a fun stamp set. 
 Create images that will flutter right off the card with the You Move Me Stamp Set and coordinating Move Me Thinlits Dies. Innovative stamping and die technologies help you create butterflies and hummingbirds that will seemingly fly right before your eyes! Plus, save 10% when you buy both products in the "You Move Me" bundle.

 Be sure to check out the video below...

 "You Move Me" Stamp set
23 photopolymer stamps
#144002  $26.00  
Pg 170 AC
  "Move Me" Thinlits Dies
#143732  $29.00
pg 214 AC
12 Thinlite dies Largest die 2 3/4" x 3 1/16"
Bundle & Save 10%
"You Move Me Bundle"
You Move Me Stamp Set + Move Thinlits Dies
#145322 $49.50
Pg 170 AC


Check out the Video below


Saturday, July 1, 2017

Day 3 Fabulous Flamingo Cards

Another fun and easy card.  Using the masking technique stamp one of the flamingos on plain lite weight copy paper-cut it out.  Set aside.  Do this 2 x's.   Stamp the Flamingo on your card-color it- and cover it with the one of the flamingos you stamped on copy paper & cut out.   (use re positional tape so it does not pull up you paper).  Stamp the next Flamingo on your card a little bite down or up on you card.  When you stamp over any part of the Flamingo that you have covered it makes it look like it is behind or in front of the other flamingo.  
 **It is important not to use thick c/s for the one you are covering bc it will leave a gap around the edges of the paper if it is too thick.
**It is also important to use re positional tape so it does not mess up the coloring of you Flamingo you are covering.
Now that both Flamingos are covered you can stamp the water and the reed around their feet. 
Fun, Easy and Fast card to make.
The colors I used are the same colors as the other ones.  
I did make some clouds in the sky using Soft Sky Ink.
I used a Birthday Sentiment but you can use whatever one you want to make this card.
Enjoy!

Thursday, June 29, 2017

Day 2- Fabulous Flamingo stamp set

I am having so much fun with this new stamp set from the Stampin' UP Annual catalog.  You can go from easy to a step up in a jiff.  Today's card I stepped it up by adding some DSP and framing it with the black c/s.  Love how it turned out.

Whisper White C/S
1- 5 1/2"x 8 1/2 score at 4 1/4"
1- 4" x 5 1/4"
 I stamped it on a 4 x 5 1/4 and cut it down as I made the card to the size I liked then mounted it on 
Basic Black C/S
The DSP I cut after deciding on the size of the Flamingo mounted design.
Petal Garden DSP pg 187 AC 48 sheets 6x6 double sided designs (4 of ea design) $10.00
Inks
Memento Ink pg 200 AC #132708  $6.00
Old Olive  #126953 pg 186  $6.50
Flirty Flamingo #141397 pg 184  $6.50
Dapper Denim  #141394 pg 184 $6.50
Tranquil Tide  #144085 pg 184  $6.50
Lemon Lime Twist  #144086 pg 184 $6.50
Wink of Stella Glitter Brush pg 200  #141897 $8.00
*Crystal Effects (to give that look of water)  
*Sorry this has been DC but you can find it at any craft store 
Any questions just send me an email.

Wednesday, June 28, 2017

Flirty Flamingo card #1 instructions (1of 5)

This is an Easy pretty much just stamping card.  
1- Whisper White c/s measuring 5 1/2" x 8 1/2" scored at 4 1/4
The stamp set is:
Fabulous Flamingo Photopolymer Stamp Set #143758  pg 177 AC
Price: $21.00
You know what they say, birds of a feather stamp together. This sassy and classy flamingo will show off your stamping skills when you carefully layer all three stamps to create a flamingo worthy of every climate!

Photopolymer stamps
* Are totally transparent for perfect image placement.
* Have just enough give to create a perfectly stamped image every time.
* Cling like crazy to our clear blocks so you don't have to worry about slipping.
* Save space—you need only one set of blocks for all your photopolymer stamps (blocks sold separately).
* Come packaged in cases with images on the spine for easy storage and quick reference.

Quantity: 12 photopolymer stamps

Ink Colors I used: All stamps are $6.50ea

*Flirty Flamingo pg 184 AC #141397 (Flamingo)
*Dapper Denim pg 184 AC #141394 (water)
**Lemon Lime Twist pg 184 AC #144086 (water and reeds)
**Tranquil Tide pg 184 AC #144085 (water)
Old Olive  pg 186 AC  #126953 (reeds)
*IC 2016-18
**IC 2017-19
Black Memento Ink pg 200 #132708 $6.00 (perfect ink that doesn't run when it gets wet)
Aqua painters (2)  pg 200 AC  #103954
Wink of Stella Glitter Brush  pg 200 AC  #141897 $8.00

I stamped the flamingo on a piece of scratch paper and cut it out. (do not use c/s for this-as it needs to be thin paper so your stamp will stamp right up to the stamp)  Set aside.  Hard  fold your Whisper White c/s in on your fold line.  Stamp you Flamingo leaving room for the water at the bottom of the paper.  Add repositional tape to the back of the flamingo you stamped on scratch paper and cover your flamingo.  (This will keep your flamingo from being stamped on and bringing it to the front when your done stamping).
 Using your water stamp-(Memento ink) stamp on 3/4 of the bottom paper-leaving the outside edge for the palm branches.  Then stamp the reeds in your water (MI)
Start stamping the palm branches alternating the colors.  Stamp 3 extra branches on c/s and fussy cut them out- set aside.  You can stamp right on the flamingo if you wish bc the scratch paper flamingo will keep ink  off the flamingo & your flamingo will be on top when paper is  removed & give your card depth.
Remove the scratch paper to begin coloring you card.
Using the Flirty Flamingo ink- stamp the color onto your flamingo.
Tip:
Here is how I color the water, reeds & flamingo legs.
 Slide your lid back (but do not open it) Press the ink lid into the ink to put a small amount of ink on the inside of the lid-open the ink & then use your aqua painter in your lid ink and color the water, reeds & flamingo legs. 
Be creative and mix your colors to make whatever you want.  
* Aqua painters are WONDERFUL to use...If new to Aqua Painters I  recommend using them before you start on your project just so you see how much color/water you need when using them.
If you make this card and would like to show it off send me a picture and I would love to post it on my blog.
Have a Wonderful week....and be sure to check back to see all the rest of the Flamingo cards I have made.
 

I am on Face Book also.
Something 4 Everyone Cards and Crafts

Monday, June 12, 2017

Coffee Cafe-Share with a Friend

 Don't you just LOVE to Share with a Friend?  I do and I love to give cards to my friends so this one it a perfect card to make someone know your are thinking of them.  Another Easy Card.  This is I am using the same DSP as all the other cards.  There are 12 double sided sheet of paper so it is so easy to change every card up.  My basic colors are Chocolate Chip, Pear Pizzazz, Winter White, and this one has some Melon Mambo also.  Can you see it?  I also stamped the words in each line separately  to make the word definition.  I found that if you ink up the words you want -then place a piece of lined paper down to cover up the words you have already stamped it is much easier to line up the words and easier not to ink where you don't want ink.  ***lined paper is much thinner than c/s and when I used c/s I could get all the words to stamp.  Lined paper worked perfectly.
The measurements are:
Whisper white c/s  5 1/2 x 11 scored at 4 1/4
Chocolate chip c/s  5 1/4 x 4
Whisper white  c/s 5 1/8 x 3 7/8
 I used crystal effects on the white lid of the large cup, coffee beans, & sm brown cup lid. I also used some stickles on the background of the card and the sleeve of the small cup.  The circle in the center was inked with Melon Mambo ink to add some more color.
I popped up the words and the coffee cups on this card. 


Sunday, June 11, 2017

Frappachino and Coffee Latte's

My favorite drink is a latte.  No whip, no foam, just s/f Vanilla.  So thats what I decided to make.  But then I decided for my card I needed to make it Pink...so I guess I made a Strawberry vanilla latte?  
On with this card.  The background I used the embossing paste again with another background stencil.  Colored the paste with the New in color 2017-19.  I think that is one of my New Favorite colors-its like a lemon/lime color....very pretty.  Another easy card and it turned out VERY cute. 
There are so many different ways to use this bundle...with the stamps or without both have many things to use to make every card different and fun. 

Friday, June 9, 2017

Coffee Cafe

I use alot of Thank you cards and I am so glad to see one of the sentiments in the set was Thanks A Latte.
Perfect for me!!!  Love this set, love this card and so excited to give it away.


Here is how I did it:

1- Early Espresso c/s 5 1/2" x 11" scored at 4 1/4" 
1- Whisper White c/s 4" x 5 1/4"
1- 3 7/8" x 5 1/8" Coffee Break DSP ( if you want it a little smaller you can I only wanted a hair of the white to show)
1-piece of WW c/s for the cups to be cut using the Framelits
After cutting them I used the sponge daubers to shadow the edges with Crumb cake ink
The sleeve I cut out using Crumb cake and shadowed the edges
I stamped the coffee beans and sentiment- cut out using the framelits
Embossing paste was used on the DSP.  I used the Fresh Fig ink refill to color the paste with the Decorative Mask. Let dry about 5 minutes.
Fresh Fig ribbon with a bow knot.
The sentiment was stamped in Island indigo ink
Another easy card.  Having the Stamps and Framelits make these cards easy.  
The Embossing paste is AWESOME!  Dries quickly- about 5 minutes depending how much you use.  I do a lite coat b/c it look nice but I am not sure how well paper will stick on it.  (I will find out on my next card and let you know)
 Any questions just let me know....I'd be happy to help you!
Have a Good day!

Thursday, June 8, 2017

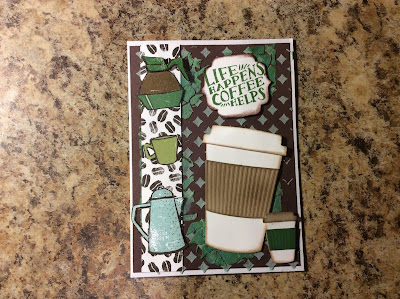
Coffee Cafe bundle card- Life Happens...instructions

So as you all know....I Love Coffee and so my first posts probably isn't surprising that I am using the New Coffee Cafe bundle.  Yes, It is one of my FAVORITES...I think I have almost every Coffee stamps set out there BUT this NEW one is GREAT.  I posted yesterday on my FB page-so if you didn't know I post there you may want to "like" my page so you get notified when  I post on there also.  I do post some different things on that.  Here is the FaceBook info:
Something 4 Everyone Cards and Crafts
The measurements for the card I posted yesterday on Facebook are below.

I absolutely LOVE my New "Coffee Café" bundle. Here is the first card I made with this set. 
Here is a list for items I used to make this card:
Coffee Café Bundle pg 30-31 AC (stamp set & framelits dies) #145331 photopolymer $45.75
Coffee Break DSP 12"x12" 12 sheets #144155 $11.00
Coffee Break CS. #144156 8 1/2" x 11" 24 sheets of crumb cake, early espresso & pear pizzazz
Whisper White CS #100730 pg 185 AC
Crumb Cake ink #126975 pg AC 185
Pear Pizzazz #131180 pg 186 AC
Sponge dauber #133773 $5.00 pg 200 AC
Embossing paste #141979 pg 201 AC $8.00
Embossing knifes #142808 pg 201 $5.00
Pattern Party Decorative Masks. #144103. $6.00
Multipurpose liquid glue pg 202 AC #110755. $4.00
Crystal effects N/A at Stampin' Up

Instructions:

1-Whisper White c/s  cut at 5 1/2 x 11  scored at 4 1/4"
1- Early Espresso c/s cut at 5 1/4 x 4"  I used the Crumb cake ink & dauber to shadow the sides of the cup, lids, coffee sleeve & sentiment
Embossing past colored with sky blue in refill and used with the Patterned Party Decorative Masks
Embossing paste colored with Pear Pizzazz used with the PP Decorative Masks. (Let dry about 5 minutes)
I used a piece of  WW CS for the cup, small cup, & sentiment
1 piece of scrap paper for the DSP on side and I cut out some of the little coffee pots & cup to put on top of the DSP paper.  Then used Crystal Effects & dimensionals to make them shiny and stand out.
Very easy card to make and I love the way it turned out.

I also post on:
Something 4 Everyone Cards and Crafts Face book page